

WinSCP is at its best when you treat it as a file manager that happens to reach servers. This guide sets up a site for web01 (192.168.20.30, SFTP on port 22, user deploy), then works through the tasks you will repeat most. It assumes the Commander interface. Use it on networks and devices you own or administer.
The Login dialog and your site list
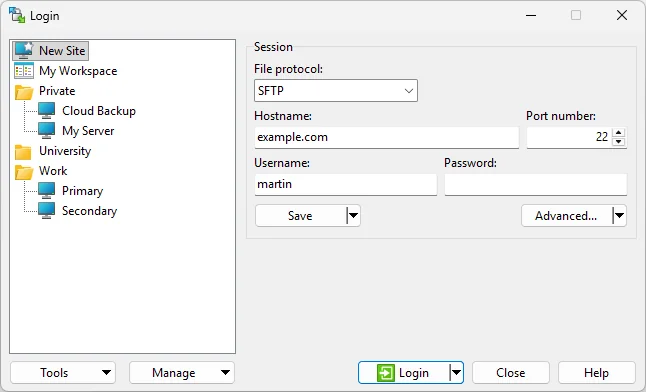
WinSCP opens with the Login dialog. On the left is your site list, which you can organise into folders; on the right, the connection details for the selected site.
New Site
Select New Site at the top of the list.
Protocol
Set File protocol to SFTP. The same dropdown offers SCP, FTP, WebDAV and S3 for other kinds of servers.
Address and account
Host name
192.168.20.30, Port number22, User namedeploy. You can leave Password empty and be asked each time.Save
Click Save and name the site
web01. To keep things tidy, put it in a folder such asWork.
If you log in with a key, click Advanced..., open SSH > Authentication and choose your private key file. WinSCP uses PuTTY’s .ppk format; if you point it at an OpenSSH key, it offers to convert it. The Tools and Manage buttons hold extras such as importing sites and editing or copying existing entries.
Connecting for the first time
Select web01 and click Login. Because WinSCP has never seen this server, it asks you to confirm the server’s host key and shows its fingerprint.
Finding your way around Commander
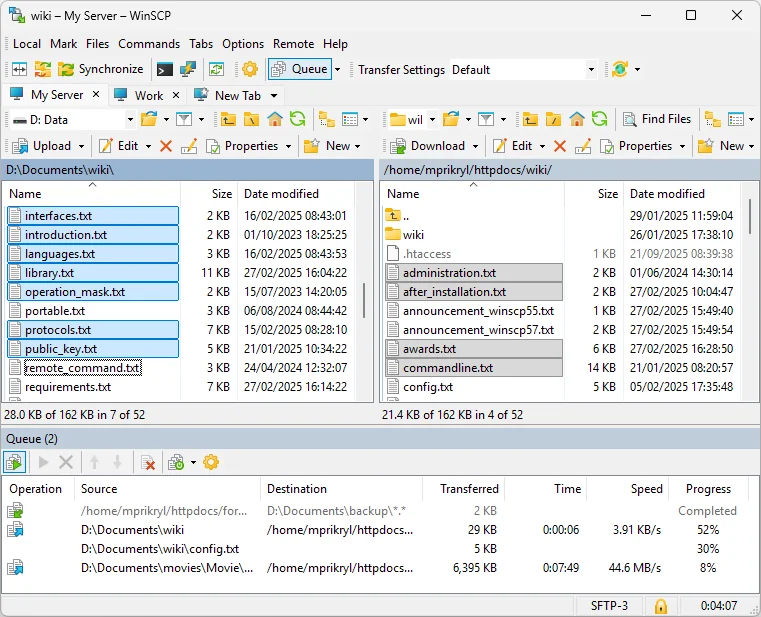
| Area | What it is for |
|---|---|
| Menu bar | Local, Mark, Files, Commands, Tabs, Options, Remote, Help |
| Toolbar | Synchronize, Queue, Transfer Settings (shows Default), plus Upload, Download, Edit, Properties and New |
| Left panel | A folder on your PC |
| Right panel | A folder on the server |
| Queue pane | Running and waiting transfers with progress and speed |
| Tabs | One per open session, so you can work on several servers at once |
Each panel has its own address bar and history. Navigate the left panel to C:\Tools\site and the right one to /home/deploy, and you are ready to move files. Version 6.5 can also show thumbnails in the panels, which helps with image folders.
Transfers and the queue
- Drag and drop between the panels, or from File Explorer into the remote panel.
- Or select files and use Upload or Download on the toolbar; a small dialog lets you confirm the target folder.
- Large jobs can run in the background: they go to the Queue and you keep browsing.
- The Queue pane shows each item’s progress and speed, so you can see what is still waiting.
- Transfer Settings on the toolbar picks a preset; Default suits most work.
Editing a file on the server
Say you need to fix a line in a configuration file on web01. Select it in the remote panel and click Edit. WinSCP downloads a temporary copy and opens it in its integrated text editor. When you save, it uploads the change straight back to the server. Close the editor when you are done. You can also configure WinSCP to use another editor you prefer.
Permissions
Uploaded scripts sometimes need to be executable, or a file needs to be readable by the web server. Select the file in the remote panel and open Properties. For SFTP and SCP sessions you can set read, write and execute rights for owner, group and others, or type the octal value such as 644 or 755. Select several files to change them together. You can only change permissions that your server account is allowed to change.
Synchronize and Keep Remote Directory up to Date
These two features are why many admins choose WinSCP over plain copy tools.
Synchronize
Open the two folders
Local
C:\Tools\siteon the left, remote/home/deploy/siteon the right.Click Synchronize
Choose the direction: update the remote side, the local side, or both.
Review the checklist
WinSCP lists every file it plans to copy or delete. Untick anything you do not want. Version 6.5 improved this checklist.
Run it
Confirm, and the changes are transferred.
Keep Remote Directory up to Date
This mode watches a local folder and uploads changes automatically as you save files, which is handy while you work on a small site or a set of configuration files. Start it for the pair of folders, leave its window open while you work, and stop it when you are finished.
A small automation script
For repeat jobs, WinSCP has a scripting mode run through winscp.com. Save the commands below as C:\Tools\upload-site.txt. Replace the host key placeholder with the fingerprint you confirmed earlier, and use a key file rather than a password in the script.
open sftp://deploy@192.168.20.30/ -hostkey="<fingerprint of web01>" -privatekey="C:\Tools\keys\deploy-web01.ppk"
synchronize remote C:\Tools\site /home/deploy/site
exitcd "C:\Program Files (x86)\WinSCP"
winscp.com /script=C:\Tools\upload-site.txt /log=C:\Tools\logs\upload-site.logThe install folder may differ on your PC. Task Scheduler can run the second command on a timetable. The WinSCP documentation covers every scripting command and the .NET assembly for larger automation.
Opening PuTTY from WinSCP
Sometimes you need a shell on the same server — to restart a service after uploading, for example. WinSCP can open a PuTTY session to the server you are connected to, reusing the host name and user. PuTTY needs to be installed for this; if WinSCP cannot find it, set its location in Preferences. Our PuTTY guide covers the terminal side.
FAQ
Should I choose SFTP or SCP?
SFTP for almost everything; it is the default for good reason and supports the full feature set. SCP is there for servers that offer nothing else.
Can I work with two servers at once?
Yes. Each session opens in its own tab, so you can switch between web01 and the NAS without logging out.
Why was a file deleted during Synchronize?
Synchronize can delete files that exist on only one side. Read the checklist before confirming, and untick anything you want to keep.
Can I use my PuTTY key?
Yes. Choose the same .ppk file under Advanced > SSH > Authentication.
Download WinSCP from the official siteOpens the official WinSCP download page. We host no files.