

Shared folders pile up. Someone creates a share for a project, a NAS gets a few extra folders, a retired PC still offers its Documents to the network. Network Scanner is good at turning that clutter into a list you can review, and this guide follows that workflow from start to finish.
Use it on networks and devices you own or administer.
The job: a map of your shared folders
A typical session has four steps: tell the scanner which addresses to visit, choose which services it should look for, filter the results down to what matters, and export a report. The result answers practical questions: which computers still share folders, which shares a normal staff account can write to, and which servers run a web or FTP service you had forgotten about.
Think of the program as a documentation tool. The scan is quick; the value is in the filtered, commented report you keep afterwards.
The window in one minute
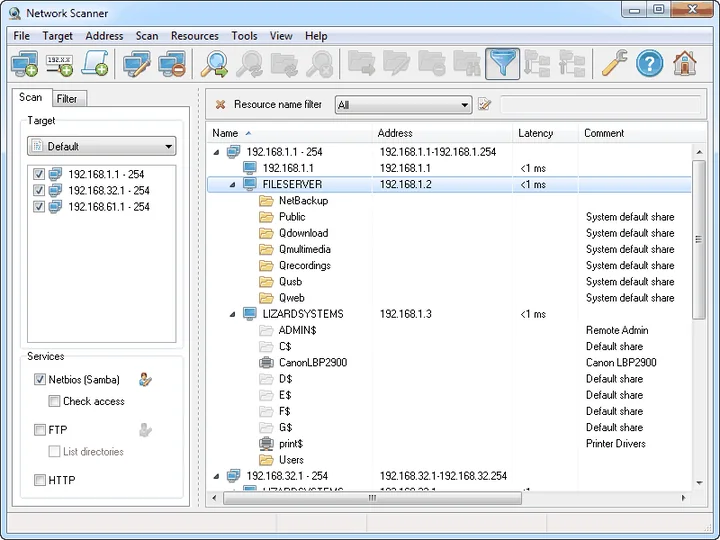
| Area | What it holds |
|---|---|
| Menus | File, Target, Address, Scan, Resources, Tools, View, Help |
| Scan tab (left) | The target — “Default” at first — with a checklist of ranges, and the Services box |
| Filter tab (left) | Checkboxes that hide or show computers and resources |
| Results tree (right) | Computers with their resources underneath; columns Name, Address, Latency, Comment |
| Resource name filter | Above the tree, set to “All” by default |
Set the targets: ranges, expressions, lists
The scanner accepts three kinds of input, and you can mix them in one target. Ranges in the checklist can be ticked or unticked, so one target can hold every subnet you look after while a scan covers only the ones you need today.
IP ranges
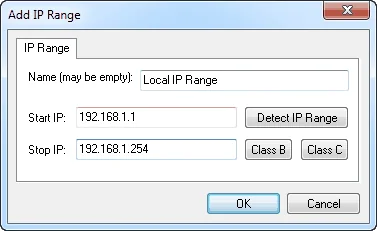
Adding a range from the Address menu opens the Add IP Range dialog. Give the range a readable name, such as “Office LAN”, and fill in Start IP and Stop IP. The Detect IP Range, Class B and Class C buttons fill the fields in for you, as their names suggest; check the addresses they produce before you confirm.
Address expressions
Expressions describe several blocks in one line: each part of the address can be a single number, a list or a range. The vendor’s own example covers the third numbers 1, 2, 5, 20 and 25 to 27, and hosts 1 to 254 in each:
192.168.1-2,5,20,25-27.1-254
192.168.20.1-254
192.168.20.10,30,40
The second line is the whole example office LAN; the third follows the same pattern to visit just the file server, the Linux server and the NAS.
Lists of computer names
If you already keep an inventory, a list of names such as FS01 saves you from scanning empty addresses. It also keeps reports readable, because each line starts with a familiar name.
Choose services and scan settings
| Service | Extra option | Finds |
|---|---|---|
| Netbios (Samba) | Check access | Windows and Samba shared folders, including administrative shares |
| FTP | List directories | FTP servers and, with the option, their folders |
| HTTP | — | Web services, such as the admin page of a printer or NAS |
For a folder audit, tick Netbios (Samba) with Check access. Add FTP and HTTP when you are documenting everything a subnet offers.
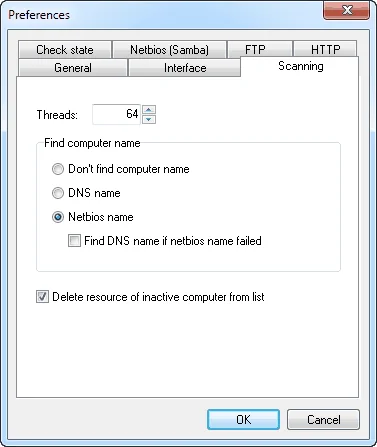
The Scanning preferences are worth a look once:
- Threads (64 by default) controls how many addresses are checked in parallel. Lower it on a slow link or a busy VPN.
- Find computer name offers Don’t find, DNS name or Netbios name. Netbios suits a Windows office; tick “Find DNS name if netbios name failed” for mixed networks.
- Delete resource of inactive computer from list keeps a re-scanned list free of stale entries.
- Whether a computer counts as up can be decided by ping or by TCP connect. Devices that ignore ping still appear with TCP connect.
Read the results tree
Each computer appears with its name and address, and a Latency value from the state check. Expand it to see its resources. A few names come up constantly:
| You see | What it is |
|---|---|
| ADMIN$, C$, D$ | Administrative shares Windows creates for administrators |
| IPC$ | A system share used for communication between computers, not a folder |
| print$ and printer names | Printer drivers and shared printers |
| Public, Users, NetBackup | Ordinary shares that someone created — the ones to review |
Names ending in $ do not show up when people browse the network, so a scanner is often the first place you notice them. Select a resource and use the Resources menu to open it in Explorer, map it as a network drive, or open a web service in your browser. Use the Comment column to record owners and decisions, such as “Finance — keep” or “old project, ask Maria”.
Narrow it down with the Filter tab
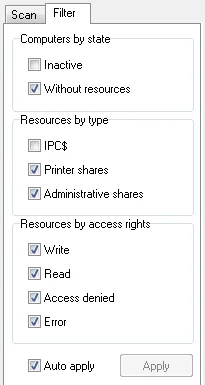
Filters decide what the tree shows. With Auto apply ticked, changes take effect at once; otherwise click Apply. The checkboxes come in three groups:
| Group | Checkboxes | Use it to |
|---|---|---|
| Computers by state | Inactive, Without resources | Drop computers that did not answer or share nothing, so the list stays short |
| Resources by type | IPC$, Printer shares, Administrative shares | Set aside system and printer entries and concentrate on folders people created |
| Resources by access rights | Write, Read, Access denied, Error | Focus on one access level, for example only the shares an account can write to |
Whether a ticked box shows or hides its group is easy to confirm: change one box, apply, and watch the tree. Do that once before you rely on a filtered export.
Check who can read and write
With Check access on, the scanner tries each share and sorts it into Write, Read, Access denied or Error. It checks as the current user or as an account you specify, and that choice decides what the report means.
Pick the account
Your admin account can reach almost everything, so its results say little. A standard test account, set up like a regular employee, shows what staff can actually do.
Scan and filter to Write
The remaining shares are those that account can change. Compare each with what the owner expects.
Fix permissions on the server
Adjust the share or folder permissions on
FS01or the NAS, then scan again to confirm.
Export and save the results
| Format | Best for |
|---|---|
| HTML | A readable report to attach to a ticket or send to a manager |
| XML | Feeding another tool or a script that builds your inventory |
| TXT | Quick comparisons with last month’s report in a text diff tool |
Separately from exports, you can save the whole result to a file and load it later with your comments intact. Name files by date, such as C:\Tools\Scans\office-2026-09.xml for an export, and the saved results become a history of your file sharing.
A simple routine works well for small offices: scan once a month with the same target and the same test account, export an HTML report for the file, and compare the TXT export with the previous one. New shares and changed access levels then stand out in a few seconds, and each change can be discussed with the owner before it becomes a habit.
What it does not do
What we like
- Focuses on shares, FTP and web services, and shows them clearly
- Checks read and write access for a chosen account
- Exports to HTML, XML and TXT
Keep in mind
- No MAC address column and no CSV export
- No portable edition
- Not a traffic tool; use Wireshark for that
FAQ
Do I need administrator rights to scan?
No. Scanning works without them; results reflect the permissions of the account used for the access check.
Why do I see C$ and ADMIN$ on every Windows PC?
They are administrative shares that Windows creates. Hide them with the Filter tab when you only want folders people created.
Can I open the report in Excel?
There is no CSV export, but HTML and XML files can be opened in most spreadsheet programs, with some tidying.
Where do I get a key?
Personal keys are free from the vendor’s site; business licences are on the purchase page. See the licence comparison.
Download Network Scanner from the official siteOpens the official Network Scanner download page. We host no files.