

Most of your time in PuTTY is spent in a black terminal window, but almost every decision is made before that, in the configuration dialog. This guide uses a Linux server called web01 (192.168.20.30, SSH on port 22, user deploy) as the running example. Use it on networks and devices you own or administer.
The configuration window
The left side is a Category tree; the right side shows the settings for whatever you selected. You will not need most of it. The branches worth knowing:
| Branch | What lives there |
|---|---|
| Session | Host name, port, connection type, saved sessions; Logging underneath |
| Terminal | Keyboard, Bell and Features — how keys and the terminal behave |
| Window | Appearance, Behaviour, Translation (character set), Selection, Colours |
| Connection | Data, Proxy, Telnet, Rlogin, SSH (including Auth) and Serial |
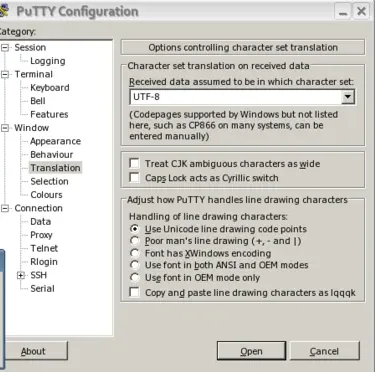
Before your first login, open Window > Translation and make sure the character set is UTF-8. Otherwise text from modern Linux systems, such as menus drawn with line characters, can appear garbled.
Your first SSH session
Go back to Session
Click Session at the top of the Category tree.
Enter the server
In Host Name (or IP address) type
192.168.20.30(ordeploy@192.168.20.30to fill in the user name too). Leave Port at 22.Choose SSH
Make sure Connection type is set to SSH.
Open
Click Open. The first time, a host key alert appears — see the next section.
Log in
Enter the user name if asked, then the password. Nothing is echoed while you type the password; that is normal.
To leave, type exit. The window closes when the session ends.
The host key check
SSH servers identify themselves with a host key. PuTTY has never seen web01 before, so it shows an alert with the key’s fingerprint and asks whether to trust it.
Do not click through it blindly. Compare the fingerprint with the one the server reports. On web01 itself (at the console, or asking whoever built it) you can print it:
ssh-keygen -lf /etc/ssh/ssh_host_ed25519_key.pubIf the fingerprints match, choose Accept. PuTTY remembers the key and stays quiet next time. If the alert ever reappears for a server you already accepted, find out why before logging in — usually the server was rebuilt, but it is worth confirming.
Saved sessions
Typing the address every time gets old quickly. On the Session page, the Saved Sessions box stores everything you have configured under a name.
Configure once
Fill in host, port and any other settings (Translation, logging, key file).
Name it
Type
web01in the Saved Sessions field and click Save.Reuse it
Next time, double-click
web01in the list, or select it and click Load, then Open.Tidy up
Select an old entry and click Delete.
Copy and paste
PuTTY does not use Ctrl+C and Ctrl+V the way other Windows apps do, because Ctrl+C means “interrupt” to the remote shell.
- Copy: select text with the mouse. It is copied as soon as you release the button.
- Paste: right-click anywhere in the terminal window.
- Paste carefully: a multi-line paste runs every line as a command on the server.
Key-based login with PuTTYgen
Keys replace the password with a file on your PC plus a passphrase. They are more convenient and are the usual choice for servers you log in to every day.
Generate the pair
Start PuTTYgen, choose a key type such as Ed25519 (RSA also works), click Generate and move the mouse over the blank area until it finishes.
Protect and save the private key
Type a passphrase, then save the private key as
C:\Tools\keys\deploy-web01.ppk. Keep this file to yourself.Copy the public key
Select the whole public key text shown at the top of the PuTTYgen window and copy it.
Put it on web01
Log in once with your password and add the key to
~/.ssh/authorized_keys(commands below).Tell PuTTY about it
Load your web01 session, go to Connection > SSH > Auth > Credentials (PuTTY 0.75 and later), browse to the
.ppkfile, return to Session and Save.
mkdir -p ~/.ssh
chmod 700 ~/.ssh
nano ~/.ssh/authorized_keys
chmod 600 ~/.ssh/authorized_keys
In the editor, paste the public key as one single line and save. Next time you open the session, PuTTY asks for the key’s passphrase instead of the account password.
Pageant: type the passphrase once
Pageant is PuTTY’s SSH agent. It holds unlocked keys in memory so that PuTTY, pscp, psftp and plink can use them without asking again.
- Start Pageant; it sits as an icon in the notification area.
- Add your
.ppkfile and enter the passphrase once. - Open any saved session — it logs in with the key silently.
- When you sign out of Windows, Pageant stops and the keys are forgotten.
Serial console for switches and routers
A new switch, or a router whose network settings need fixing, often needs the serial console. PuTTY handles that too, with a USB-to-serial adapter or console cable.
Find the COM port
Plug in the cable and open Device Manager > Ports (COM & LPT). Note the number, for example
COM3.Choose Serial
On the Session page, set Connection type to Serial. The fields change to Serial line and Speed.
Set line and speed
Enter
COM3and the speed from the device’s manual, commonly9600. Data bits, parity and flow control are under Connection > Serial if the manual asks for something unusual.Open and press Enter
Many devices print nothing until you press Enter once.
Logging a session
When you make changes on a device, a log of what you typed and what came back is useful for your notes or a change ticket. Under Session > Logging, choose to log the printable output (what you see on screen), give a file name such as C:\Tools\logs\web01.log, and save it into the session. Logs can contain sensitive information, so store them with care.
pscp and plink in one minute
The command-line tools use the same host keys, saved sessions and Pageant keys as PuTTY. A few starting points:
pscp C:\Tools\report.txt deploy@192.168.20.30:/home/deploy/
pscp deploy@192.168.20.30:/home/deploy/backup.tar.gz C:\Tools\
pscp -load web01 C:\Tools\site.conf deploy@192.168.20.30:/home/deploy/
plink -ssh deploy@192.168.20.30 uptime
plink -load web01 "df -h"
psftp deploy@192.168.20.30
For regular file transfers with a graphical view, WinSCP is more comfortable; see how to use WinSCP.
What PuTTY does not do
- No tabs: each session is its own window.
- No graphical file browser — use pscp, psftp or WinSCP.
- Its
.ppkkey format differs from OpenSSH files; PuTTYgen can load and convert them. - No built-in updater; see the update notes.
FAQ
Where do I set the key file in newer versions?
Connection > SSH > Auth > Credentials, from PuTTY 0.75 onward. Older guides show it directly on the Auth page.
Why does my paste run commands?
Right-click pastes everything on the clipboard, including line breaks, and each line break is an Enter. Check what you copied before pasting into a server.
Can I use the same key on several servers?
Yes. Add the same public key line to ~/.ssh/authorized_keys on each server you administer.
The screen shows odd characters instead of lines.
Set Window > Translation to UTF-8, save the session and reconnect.
Download PuTTY from the official siteOpens the official PuTTY download page. We host no files.