

Advanced IP Scanner answers one question very quickly: what is on this network right now? Everything else — shares, remote desktop, power control — hangs off the right-click menu of a result.
This guide uses a typical small office: LAN 192.168.20.0/24, router at 192.168.20.1, file server FS01 at 192.168.20.10, a Linux server web01 at .30, a NAS at .40 and a printer at .50. If you have not set the program up yet, start with the download and install page. Use it on networks and devices you own or administer.
The window at a glance
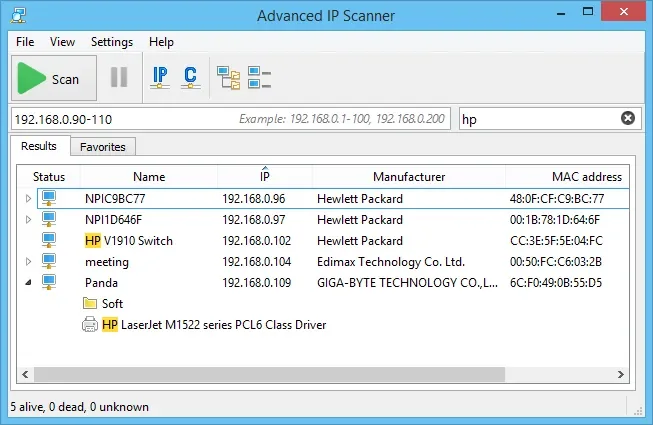
| Area | What it is for |
|---|---|
| Menu bar | File (including export), View, Settings, Help |
| Toolbar | Green Scan button, Pause, the IP and C range buttons, two view buttons |
| Range field | The addresses to scan, e.g. 192.168.0.90-110 |
| Search box | Narrows the visible results; the screenshot shows “hp” |
| Tabs | Results for the latest scan, Favorites for devices you pinned |
| Status bar | Counts, e.g. “5 alive, 0 dead, 0 unknown” |
Scan an address range

Set the range.
The quickest way is the C button, which fills in a class-C style range based on this computer’s subnet; IP works from this computer’s address too. You can also type a range by hand.
Adjust it if needed.
The field accepts ranges and single addresses separated by commas, just like the built-in hint “Example: 192.168.0.1-100, 192.168.0.200”. For the example office,
192.168.20.1-254covers the whole LAN, while192.168.20.1-60covers only the fixed-address infrastructure.Click Scan.
Results fill in as devices answer. Use Pause if you need to stop and look at something before the scan ends.
Check the status bar.
It tells you how many hosts were alive, dead or unknown, a handy sanity check when you expect, say, twenty devices and see five.
Not sure which subnet you are on? Ask Windows first:
ipconfigRead the results
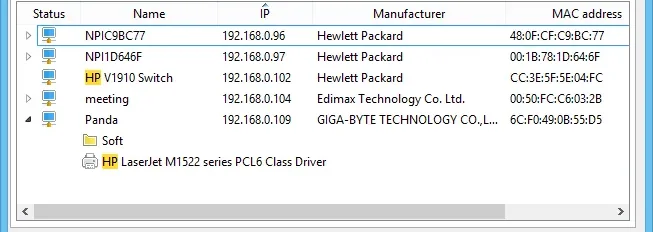
Each row is one device. The columns you will read most are:
| Column | What it tells you |
|---|---|
| Status | Whether the device answered during this scan |
| Name | The device’s network name, when it publishes one |
| IP | Its current address |
| Manufacturer | The maker of its network adapter, taken from the MAC address |
| MAC address | The hardware address, useful for DHCP reservations and asset lists |
| Comments | Your own notes, e.g. “reception PC” or “spare switch” |
The Manufacturer column is often the fastest way to identify an unnamed device: a row with no name but an HP adapter at 192.168.20.50 is almost certainly the printer. The search box helps on busy networks — type part of a name or maker and the list narrows.
Browse shared folders and printers
Windows computers and many NAS boxes publish their shares. Expand a computer in the results (the small arrow or plus sign next to it) and the program lists its shared folders and printers, as in the screenshot where Panda shows the folder “Soft” and an HP LaserJet printer.
Expand the device.
For example the NAS at
192.168.20.40orFS01.Right-click a shared folder and choose to explore it.
It opens in File Explorer, just as if you had typed
\\FS01\shareyourself.Sign in if asked.
Windows applies the same permissions as always; the scanner only saves you the typing.
Connect with RDP or Radmin
Right-click a computer and the menu offers remote connections. RDP starts the standard Windows Remote Desktop client aimed at that address. For it to work, Remote Desktop must be enabled on the target PC and your account must be allowed to sign in there.
Radmin is Famatech’s own remote control product. The option only helps if Radmin is already part of your toolkit on both ends; if you do not use it, ignore that entry.
Wake-on-LAN and remote shutdown
The right-click menu also includes switching computers on with Wake-on-LAN and shutting them down remotely. Both are handy at the end of a day or before maintenance, but neither works out of the box. The target has to be prepared first:
- Wake-on-LAN: enabled in the computer’s BIOS/UEFI and in the network adapter’s power settings in Device Manager, and the PC connected by cable.
- Remote shutdown: an account with administrator rights on the target computer.
- The device has been seen by a scan before, so its MAC address is known.
Keep key devices in Favorites
Right-click a result and add it to Favorites. The Favorites tab then keeps your router, servers, NAS and printer in one short list, separate from the full scan, so you can open a share or a remote session without rescanning the whole range.
Export the list to CSV
Run a full scan.
Use the complete range so the file reflects the whole network.
Open the File menu and choose the export option.
Pick CSV as the format.
Save it with a date in the name.
For example
C:\Tools\lan-2026-09.csv. Excel or any spreadsheet opens it directly.
A monthly export is a simple asset list: compare two files and new or missing devices stand out immediately.
Habits that make scans more useful
- Fill in the Comments column for anything you would not recognise in six months.
- Scan once when everyone is in the office and once after hours; the difference shows which devices are always on.
- Keep DHCP reservations in line with the MAC addresses you see here.
- Look through the Settings menu once; the exact options may differ slightly between versions.
What it does not do
Advanced IP Scanner is a LAN inventory tool, not a traffic analyser. To see what devices are actually sending, use Wireshark. For custom data columns and exports to XML or plain text, Angry IP Scanner is more flexible, and for checking read and write access on every share, see LizardSystems Network Scanner.
FAQ
Does it need to be installed?
No. Choose Run in the setup wizard to use it as a portable edition.
Why can’t I wake a computer?
Wake-on-LAN has to be enabled in the BIOS/UEFI and on the network adapter, and it usually needs a wired connection.
Why does a device show no name?
Many small devices do not publish one. Use the Manufacturer and MAC address columns, then add a comment.
Can I share the results with a colleague?
Yes, export them to CSV from the File menu.
Download Advanced IP Scanner from the official siteOpens the official Advanced IP Scanner download page. We host no files.